Search This Blog

Wednesday, February 29, 2012

Performance Photography: A fixed 50 solution.

So I've been talking about how to use the camera meter to determine the best exposure for an image in my last couple blogs. Additionally, I've mentioned a little bit about the shutter and how it's important to know  how to set the shutter according to the meter and the scenario. But what happens if you face a scene where you CAN'T drag the shutter because the subject is in too much motion? And what happens if you are not allowed to use flash? 


A concert is one such scene. It's low light, the lights change constantly and the artist/musician is usually in motion. Plus management doesn't allow you to use flash what-so-ever. My first concert shoot was an intimate show by the band Dishwalla back in 2000. It was a fun gig, but more than anything, it was a learning experience I really needed. 


Most of my shots came out blurry or out of focus and just plain dark. I didn't understand why until I began to understand that shooting without a flash was actually a challenge. Luckily, I was able to get one shot to be decent for the publication. But I learned a lot and I spent the next week practicing in low light conditions. The first thing I did was go out and buy a fast prime lens. For me, that was a 50mm 1.8 lens. 


I bought the lens and went straight to practice (yes, I turned off the lights). What did I practice on?....My cats! In fact, it was almost perfect. The electricity went out during a heavy thunderstorm the first night I had my fixed 50mm 1.8 lens. With my fixed 50, I quickly learned that shooting at 1.8 was really fun! 


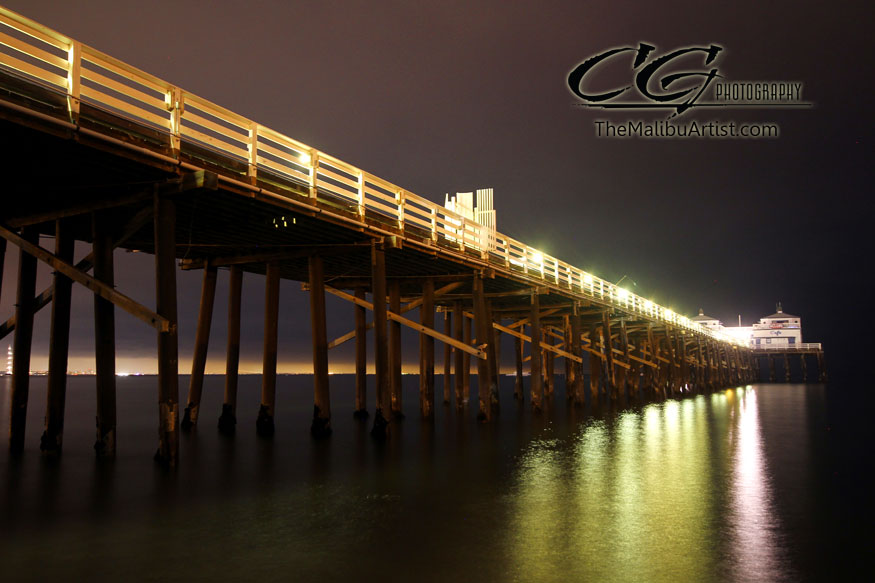
Here's one of my practice shots. To this day, this is one of my most treasured images I've ever taken.


Here's a my list of tips for anyone shooting objects moving in low light without flash: I now live by these guidelines even when I'm shooting reception photos at weddings.

  1. You need to shoot wide open. F8 just won't cut it. If possible get you a fixed 50 1.4 or 1.8 lens. The 1.8 is my favorite. Both of those lens are musts for concert or low light photography.
  2. Do not be afraid to "push" your ISO. Most digital SLR's  are amazing at high ISO's. Learn about ISO Expansion in your user manual. Typically, 800ISO is preferred for concerts, but many times you have to go as high as 3200 ISO. Again, do not be afraid to shoot it at high ISO. 
  3. Time your shots. I've gotten really good at timing the action. Along with shooting continuously, you will learn that most of the sharpest images will always be when the performer is at the peak of the action (If he/she jumps up during a dance, it means taking the image at the top of the jump when, for a fraction of a sec, the artist is still).
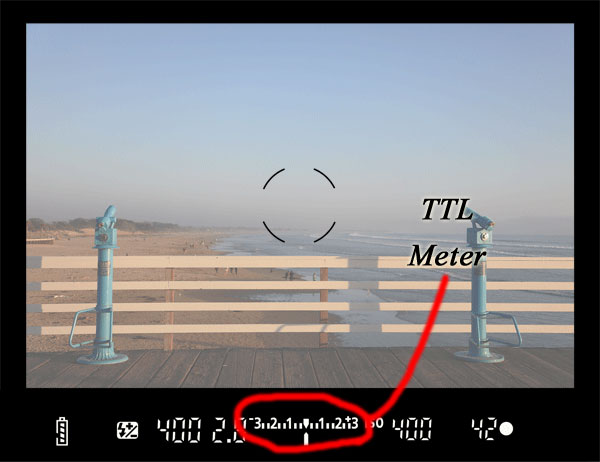
  4. Remember, it's better to underexpose by a half stop, than to overexpose. 

Since that first shoot, here are some examples of some other concert images I've taken using the lessons I learned. 
The Edge of U2 during the Vertigo Tour in Denver 2005.


Brittany Spears taken with a 70-200mm 2.8 lens. 


Steve Tyler of Aerosmith taken with a 50mm.


The bottom line, it took a bunch of dark and blurry photos for me to learn how to shoot a concert. It's allowed me to appreciate a fixed lens that I now consider a must for anyone with an SLR. 


Here's a link to the very affordable fixed 50mm lens that I recommend. 
http://www.bhphotovideo.com/c/product/12142-USA/Canon_2514A002_Normal_EF_50mm_f_1_8.html

There is also a lens I really really recommend, but at a much higher price; the 50mm 1.4.

http://www.bhphotovideo.com/c/product/12140-USA/Canon_2515A003_50mm_f_1_4_USM_Autofocus.html

 -cg


Monday, February 27, 2012

Metering Modes: Be a human meter!


After last night's post, hopefully you know where to find the meter on your D-SLR now. You now need to know how to use it properly. 


Remember, the meter will give you input about the exposure for the ISO, F-Stop, Shutter speed you have set. If the meter shows it's dark (-2 for example), you have to adjust accordingly to allow more “light” into the lens.  A correct exposure will bring the meter to the middle. 

Most cameras, however, have different modes you can use that can give you the info you need to meter various lighting conditions.Here are the standard metering modes found on D-SLR’s (There are a few more advanced and specialized modes but quite frankly I don’t use them often).
  •  Evaluative metering (Matrix on a Nikon)
  •  Partial metering (Spot on a Nikon)
  • Center-Weighted Average Metering  (Center-Weighted Metering on Nikon cameras) 
Evaluative Metering:
The EVALUATIVE mode is the one I use most often. In this mode the reading is taking as an average of the entire scene. In this mode, the emphasis for the meter will be prioritized by the autofocus point. Metering information from that part of the scene is given a little more weight than metering information from elsewhere in the scene. It essentially evaluates the whole frame based on this point and it creates an average for the whole scene. This is the mode from which you'll usually get a good overall exposure. The shot below is an example of it's use.

Taken at College Fjords in Alaska. It was a gray scene with a pretty even light source. Evaluative Metering was sufficient for this scene.. 


Partial Metering:
This setting is most useful when your subject is backlit (think someone with the sun behind).  Basically in this mode, the camera uses information to take a meter reading from a specific part of a scene or subject.  For example, if you are standing on a street looking into a garage with a sports car in it (the garage will obviously be darker) you might want to switch to the spot meter to spot where the car is to determine the exposure.
Below is an image at Yosemite I took using the Partial Meter. 

Use of the spot meter in this image was helpful in determining the proper exposure. The background was much brighter than the rocks and snow in the foreground. 

Center-Weighted Average Metering:
This metering setting gives priority to the center portion of the photograph, but also takes the surrounding portions of the shot into consideration. Basically, this is a combination of Evaluative and Partial Metering. I tried to find a recent image where I have used this, but came up with none. It is useful, but I just don't really use it. 

Instead, I will attach this image. It's a visual example of the metering mode I've discussed above.


So now that we have those metering modes defined we can start discussing how to apply them. Remember, all of these metering modes are for use in Manual mode. 

Metering is one of those technical aspects that I've really focused on. It's something I love about photography. Eventually, you will have enough practice to determine  good exposure for most scenes based on your "eye".  I've done it so many times I can look at a scene and determine the proper camera setting within a half stop. It's a good practice once you've done it a few times. See if you can sit in a room and "guess" the exposure. 

Grab your camera and see how close you can get. Afterall, if you can become a human meter...it will outperform any computer! ;-) -cg


Sunday, February 26, 2012

Where is the meter?


I find it funny that on days when I actually set aside time to go shoot landscapes or waterscapes at sunset in Malibu, I can never get an extraordinary sunset. Don’t get me wrong, it’s pretty picky to say that the sunset was not good in Malibu, but in comparison to some of the extraordinary sunsets I’ve seen while stuck in LA traffic or when I don't have my camera handy, I just can’t seem to get those amazing sunsets when I actually plan it. It can be frustrating!

Here’s a shot from tonight. 


This was the last photo I took in fact. It was basically dark by this time and I just pulled over on Pacific Coast Highway by a spot near County Line that said “Coastal Access”.  I walked down to the beach and snapped a 30 sec. exposure of the scene.  Its evenings like tonight where I remind myself that not every shot I’m going to take is going to be an award winner.

Somewhat satisfied, I tried to think of something I could share about this image when it came to me. Why don’t I introduce the in-camera metering so I can talk about how to meter in the future?

For many photographers, professional or hobbyist, the fact that you must learn how to “meter” a scene to get a desired result can be challenging. It may be challenging to find that magic zone…

To me, the “magic zone” is the calculation that the photographer makes to “balance” the brightest spot in the scene with the darkest spot in the scene. Now explaining this concept will take a little more than this one blog...trust me, I will be discussing this in subsequent blogs.

But for this evening, I want to define what the meter is in your camera and I just want you to find it. Whether you are using a point and shoot, or a DSLR, every camera has a meter. A DSLR has a TTL (through the lens) meter. It tells you that your exposure is the best the camera can get to bring out detail in all areas, light and dark.  

So let’s find the meter.

On the top of the Canon 7D it's here. 


Inside it looks like this (For Nikons it will be similar).
Image courtesy BHphotovideo.com

Now that you know where the meter is; try this. Watch what the meter does when you point it to dark areas and to bright areas (on a DSLR hold the shutter down to activate it by the way). This is important. This should become second nature to you before you take any photo. Look at the meter. It will also be displayed in the camera viewfinder as well.

Basically, if the meter moves to -2, the photo will come out about 2 stops dark. If the meter is -2 and blinking, well, your result will be a very dark photo. The concept  is the same for the other end. If the meter blinks at +2 the shot will be too bright.

Now back to my photo from tonight. I basically pointed my camera at the darker area of the scene (the big rock below) to get a reading or what my meter said at 30 seconds. I adjusted accordingly, but it was just a little more complex than that because if I exposed the rock as the meter suggested, the sky would be too bright. So instead of F-22 I went to F-28 on the aperture (again..more on that relationship in the future). 

So basically, to achieve a good shot, you must adjust the shutter and /or aperture (after you determine the proper ISO for the scene of course) in response to what the meter is saying.

Now tonight’s blog will hopefully have you knowing where your meter is and how to activate it. If so, then we have success. But that is the just the tip of the iceberg, because metering isn’t as simple as looking at it before every shot.  In my next blog I want to discuss Evaluative metering, Spot metering (a must for nature and landscape photographers) and how to use metering for well balanced and colorful photos. -cg

Saturday, February 25, 2012

Malibu's Pier. A night exposure.


Last night, I wrote about a few basic applications of shutter speed. So tonight I thought I’d actually go out and play a little bit in the dark and experiment with slow shutters. I took a short drive to the Malibu Pier. There was no moon tonight (behind the clouds) so it was exceptionally dark. At first glance, you wouldn’t think that it would even be possible to get a Fine Art print in this darkness.

Here’s the results…
The Malibu Pier. Manual Mode 30 sec exposure at F-4.5 at 200 ISO
You see, in my opinion, the best way to actually see and understand the concepts of light and its relation to the camera is to practice in the dark. Try it for yourself. Use Tv mode on a Canon DSLR (S-mode on Nikon) and just turn out the lights to begin (Of course, strive to make your way to using Manual Mode at least 90% of the time).  

When I used to teach photography courses in conjunction with a local university people in my classes always thought it was odd that on the first day of class I would not turn the lights off in the room. Sure, we used to do all the introductions and ice breakers with the lights on, but then, I’d just turn out the lights.
   
The thing about shooting in the dark is that you can literally see the concepts of F-Stop, ISO and Shutter. With the lights off you can drag the shutter for say 30 seconds and surprise yourself with the amount of light there actually is in the room. Once you see this for the first time, you will be hooked.  Then you can really have fun and start “painting” with light (something I will discuss in the future) or manually control the amount of light going into the shutter by putting you hand over the lens while the shutter is open.

The Malibu Pier. Manual 30 second exposure at F 5.6 at 200 ISO...this is stopped down to 5.6  because the scene was brighter. 

For the shot of the pier above, I used a 30 second exposure. The movement of the water, the airplanes, and even a big yacht in the background is captured, but adds to the artistic element.  Remember, when the shutter is open for long time it’s sort of acting like a video camera, it recording the motion in front of it, but not in a video sense. The only way to understand this concept is to shoot it yourself and see.  

There are just a couple basic things to remember when you do turn out the lights.
  •     Stabilize the camera or use a tripod to ensure you get sharp photos.
  •     Remember your subject.  A moving subject in the dark will appear like a ghost and won’t necessary come out (lots of fake ghost photos are done this way by the way)
  •      Photo’s in the dark are normally best for stationary objects.

I’m going to try to keep these blogs short and simple, but I will be adding more advanced details in the future. In the meantime…dim the lights or turn out the lights and surprise yourself! -cg 

Friday, February 24, 2012

Shutter Time!


One of the most enjoyable aspects of photography when shooting in M (manual) mode is the ability to control the speed of the shutter. In my opinion, the shutter speed is the core of experimenting with your camera; of course you always have to balance your ISO and F-Stop for the correct desired result (more on that in the future).

Below is an image I recently took on a trip to Costa Rica of a wild macaw in flight. Although it’s 1/640 isn’t necessarily a super-fast shutter speed, it is still fast enough to capture a bird like this in flight. Remember, fast shutter speeds are okay handheld, but the slower speeds, usually anything less than 1/90sec, a tripod is advisable for sharp results. 
This shot was a shot at 1/640 of a second at F 4.5 with 400 ISO in the jungle of Costa Rica.   
Now this image taken in Jamaica of a freshwater waterfall falling into the ocean is the complete opposite of the flying macaw. The silky look you get from the water is a result of the slow shutter. Shots of this speed basically can’t be hand held (in most instances) if you want to get the "silky" look. You must use a tripod or you run a high risk of blurry or out of focus images.

When shooting slow, however, remember that motion will appear in the images. A slow shutter will display the movement. That's why the water looks like it does. So remember what your subject is before shooting. If you are trying to shoot your child playing in a park or an animal that is moving, the slow shutter will result in the subject becoming blurred because of the motion. It is about experimentation though. Try a slow shutter speed on moving subjects too...you might like the artsy result as well.  

This image was captured 1/15 sec at F-8 with 200 ISO.
My advice to new photographers or to photographers who aren't quite comfortable shooting M mode 100% of the time is to practice shooting in Time Value Mode. This is where you as the photographer select the Shutter Speed and the camera’s computer picks the aperture for the scene.  In Canon camera’s this is known as Tv Mode on the top dial and on Nikon’s it’s designated as S-Mode on the top dial. So go on out and experiment with your shutters…it’s the only way to learn! -cg

Malibu's Sands of Fire

"Amazing Grace"
For just a few seconds the sands light up in Malibu every evening (and in the morning too I suppose). And sometimes if you are in the right place at the right time, you can be lucky enough to catch the beautiful sight that changes the sands to fire. It's the same concept that makes Horsetail Fall in Yosemite shine like a lava flow during the winter at Yosemite. 

**If you live in LA you may have seen this image featured in the Malibu Times Magazine in December. 
For this image, I can honestly say I got lucky. I was actually photographing a double rainbow over the ocean at the time and happened to just turn around for a second to see the last rays of light touch the sand from over the hill. 
Since I shoot M (manual) mode 100% of the time I've instinctively become accustomed to shooting under difficult lighting conditions. This particular scene required a very fast evaluation of scene using both the internal camera meter and a trained eye. 

I began with my standard ISO setting for longer exposures. 200 ISO
Why 200 ISO? Really, it's because it's my comfort ISO. Technically, 100 would probably be better but I just happened to use 200 on this one because of the rainbow I was shooting prior. 200 let's me shoot just a tad faster than 100. Since I expect to enlarge most of my prints I also like less grain and it allows me to drag the shutter just a tad bit more than higher ISO's without too much of a color shift.

In a nutshell, I metered for the middle of the scene in this image. But here is the lucky part; when I took the image I didn't see the sand lighting up like fire. It was only after I saw the image on a big screen that I noticed the 'fire on the sand". The sand actually only lit up for that second that I clicked this one and only image of the event.

For this photo, I metered the cliff-side, which was significantly darker. Knowing that the sky would be "blown out" I of course had to make an adjustment in the shutter. Instead of dragging at 1/10 as the meter suggested I bumped up the shutter to 1/60 which effectively averaged the brightest spot (sky) and the darkest spot (cliff) to create a balanced exposure. 

Here's the image details:
  • ISO 200 
  • F-5.6
  • 1/60 sec shutter
  • Shot at 10mm
Bottom line: Sometimes mixing photographic technique isn't enough to create a memorable image. Sometimes you just need a little luck...and the sun feathering the sands at the right moment. -cg