
I find it funny that on days when I actually set aside time
to go shoot landscapes or waterscapes at sunset in Malibu, I can never get an extraordinary
sunset. Don’t get me wrong, it’s pretty picky to say that the sunset was not
good in Malibu, but in comparison to some of the extraordinary sunsets I’ve
seen while stuck in LA traffic or when I don't have my camera handy, I just can’t seem
to get those amazing sunsets when I actually plan it. It can be frustrating!
Here’s a shot from tonight.

This was the last photo I took in
fact. It was basically dark by this time and I just pulled over on Pacific
Coast Highway by a spot near County Line that said “Coastal Access”. I walked down to the beach and snapped a 30
sec. exposure of the scene. Its evenings
like tonight where I remind myself that not every shot I’m going to take is
going to be an award winner.
Somewhat satisfied, I tried to think of something I could
share about this image when it came to me. Why don’t I introduce the in-camera
metering so I can talk about how to meter in the future?
For many photographers, professional or hobbyist, the fact
that you must learn how to “meter” a scene to get a desired result can be
challenging. It may be challenging to find that magic zone…
To me, the “magic zone” is the calculation that the
photographer makes to “balance” the brightest spot in the scene with the
darkest spot in the scene. Now explaining this concept will take a little more
than this one blog...trust me, I will be discussing this in subsequent blogs.
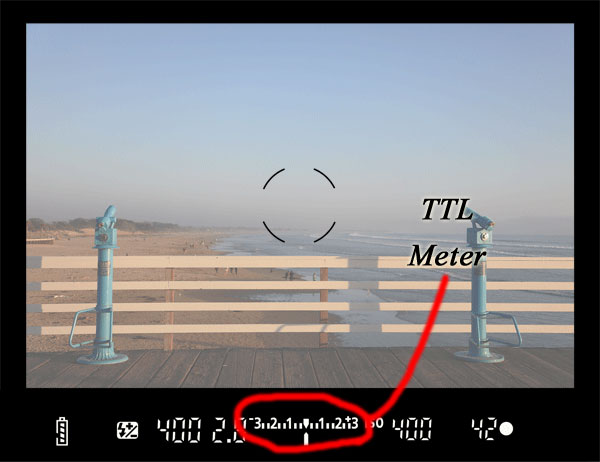
But for this evening, I want to define what the meter is in
your camera and I just want you to find it. Whether you are using a point and
shoot, or a DSLR, every camera has a meter. A DSLR has a TTL (through the lens) meter. It tells you that
your exposure is the best the camera can get to bring out detail in all areas,
light and dark.
So let’s find the meter.
On the top of the Canon 7D it's here.

Inside it looks like this (For Nikons it will be similar).
 |
| Image courtesy BHphotovideo.com |
Now that you know where the meter is; try this. Watch what
the meter does when you point it to dark areas and to bright areas (on a DSLR hold
the shutter down to activate it by the way). This is important. This should
become second nature to you before you take any photo. Look at the meter. It
will also be displayed in the camera viewfinder as well.
Basically, if the meter moves to -2, the photo will come out
about 2 stops dark. If the meter is -2 and blinking, well, your result will be
a very dark photo. The concept is the
same for the other end. If the meter blinks at +2 the shot will be too bright.
Now back to my photo from tonight. I basically pointed my camera at the darker area of the scene (the big rock below) to get a reading or what my meter said at 30 seconds. I adjusted accordingly, but it was just a little more complex than that because if I exposed the rock as the meter suggested, the sky would be too bright. So instead of F-22 I went to F-28 on the aperture (again..more on that relationship in the future).
So basically, to achieve a good shot, you must adjust the
shutter and /or aperture (after you determine the proper ISO for the scene
of course) in response to what the meter is saying.
Now tonight’s blog will hopefully have you knowing where
your meter is and how to activate it. If so, then we have success. But that is
the just the tip of the iceberg, because metering isn’t as simple as looking at
it before every shot. In my next blog I
want to discuss Evaluative metering, Spot metering (a must for nature and
landscape photographers) and how to use metering for well balanced and colorful
photos. -cg
No comments:
Post a Comment