Some of the most beautiful photographs in the world happen to be
silhouettes. In my opinion, a silhouette is also one of the most fun creations
a photographer can make with his camera. That’s why with nearly every portrait
session I shoot, every wedding I shoot, and every landscape opportunity I get;
I always incorporate a silhouette into my work.
Of course, I always encourage everyone to use Manuel mode on their
camera, but you can also use some of the other modes such as Av (A on Nikon)
and Tv (S on Nikon). Remember, to disable your flash. Quite simply, you want as
little light on the front of your subject as possible and the flash does
opposite of that, so disable it.
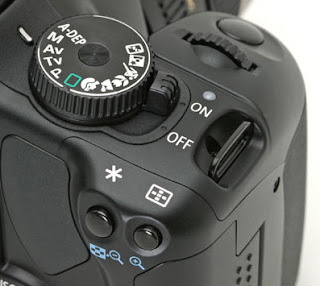
My biggest suggestion is to NOT use the Automatic settings on your camera. The biggest reason you don’t want to use the Automatic modes is mainly because if you have a backlit subject, the camera in most cases, will use the built-in flash to light the subject you want to be in silhouette. So basically, my suggestion is to use the modes “north” of the green automatic button on your camera (See image below below).
 |
| On a Canon Camera; the modes below the green square are the automatic modes. The green square is the general purpose fully auto mode. |
Here are my suggestions for taking silhouette photos.
- Most photographers have a different view on this, but I suggest pre-focusing on your subject before metering for the sky. So hold down the shutter button (don’t let go) to focus on your subject.
- Then point you camera at the sky (not the sun) in your frame and read the meter. (In general, metering for the brightest spot in the frame, will naturally make the object in the foreground appear dark and in silhouette).
- Once you've done this, use your meter (if you are shooting in Manual mode) to determine the proper exposure for the sky. By the way, shooting a silhouette will give you the opportunity to test out your “spot” meter I discussed in a previous blog.
- Make sure and light your subject from behind using good composition. Remember, you can create a silhouette at any time of the day or with any type of light, you just have to backlight the subject and expose for the background.
Now here are some tips that most photographers just forget
to give when it comes to silhouettes.
- Pay attention to your horizon! Remember, for images that involve the sky, your sky will be the bright spot that will create the outline for your silhouette.
- My favorite tip. Lower the viewfinder and get some prospective! Shooting from a low angle will lower the chances of having “mergers” that will sometimes ruin your silhouette. Remember that a silhouette will take the shape of all the subjects in the foreground.
- Think about your subject. You don’t want to confuse anyone or have people guessing what your subject is. You may notice that most all my landscape or water-scape silhouettes are taken from a low angle.
- Try aiming at your subject with the sun directly behind it for that magical glow.
- Don’t be afraid to break the Rule of Thirds. I’ve found some of my favorite silhouettes were with the subject centered. Experiment a little.
Remember, there isn't an exact equation or formula to taking a great silhouette. Like everything else in photography, it takes practice, experimentation, and maybe even a little luck. But that’s what makes it so fun! -cg


No comments:
Post a Comment